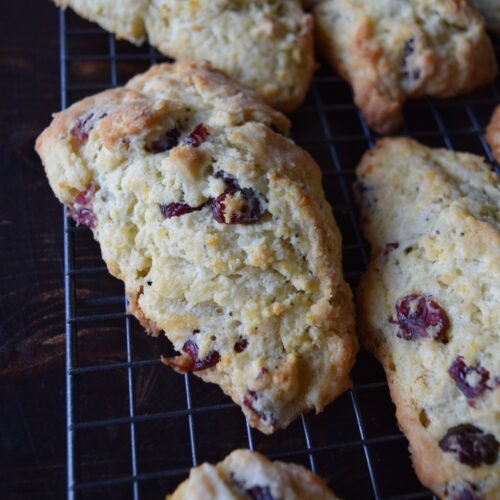
Cranberry-Orange Scones
Cranberry-Orange is my favorite flavor combination for scones, but you can absolutely switch out the fruit for another, to make cherry or blueberry, etc, and keep the same ratios for a very tender and delicious batch of scones. This is a classic recipe, that is always made free of eggs. I provide notes for making them both gluten free and vegan/dairy free.If you would like to top them with my recipe for icing/glaze, please see my full recipe post for scones, or search the blog, at glorifiedhobby.com.These scones are best baked and served the same day. You can seal them in an air tight contanier for up to three days, or freeze the cut dough and bake at your convenience. Bake time for frozen scone dough adds a few more minutes to the instructions below.
Ingredients
- 1 and 3/4 cups flour for gluten free scones, switch-out for 1:1 ratio gluten free flour
- 1/2 cup flour set aside for dusting
- 12 tablespoons cold butter one and one half sticks of salted, or switch out for vegan butter. If using vegan butter, increase flour by 1/4 cup.
- 1/4 cup granulated sugar
- 2 and 1/2 teaspoons baking powder
- 1/2 teaspoon baking soda
- 1/2 teaspoon salt
- 2/3 cup buttermilk
- 2 teaspoons (zest of a whole orange)
if using dried fruit/cranberries:
- 1/2 cup dried cranberries or dried fruit like cherries, blueberries, apricots, etc.
- 3 tablespoons orange juice or any liquid that compliments the fruit you are using
if using wet fruit like prepared or canned cranberries or pie filling for a different flavor of scone
- 3/4 cup fruit cooked/prepared cranberry sauce, blueberry pie filling, cherry pie filling, etc.
optional ingredients
- 1 teaspoon pure vanilla extract or other complimenting extracts
- 1 teaspoon poppy seeds
Instructions
- Preheat oven to 400 degrees. Prepare a cookie sheet with either parchment paper or a baking/silpat mat.
- Please refer to my brief YouTube video for putting this together.
- In a large bowl, place all the dry ingredients: flour, sugar, baking powder, baking soda, and salt.
- Cut the cold butter into pats and place on top of the dry mixture. Use a pastry blender or fork to cut the butter into the flour mixture. You do not want to use your fingers for this because you want to keep the butter bits cold. You are done preparing the butter once your pieces are all close to pea-sized.
- Make a well into the center. Add buttermilk, dried or wet fruit, juice, zest, extracts or seeds.
- Cover the well with the flour from the outside circle of the bowl. Totally combine the ingredients.
- You will want to handle the dough as little as possible, so that you are gently working with it. Dust with a little flour if too wet before forming a ball inside the bowl.
- Now you are ready to cut your scone pieces. Dust a little flour onto a flat surface that you can also use to cut with a knife. Fold over at least once and then form into a flat, piece that is unified in height. You can use a biscuit cutter, or cut into triangles with a knife.
- Place on the prepared cookie with the pieces of dough spread apart since they will spread during the baking process.
- Bake for 15-20 miunutes, until golden all around - bottom and top.
- Allow to cool. Top with set icing, or serve as-is, with lemon curd or jam on the side.
- The best result is when eaten the same day. They can be stored in an air tight container for up to three days. If you only want to make a few at a time, freeze the shaped scones that you do not bake for up to three weeks. They would only need a few extra minutes in the oven, and no thawing is necessary.