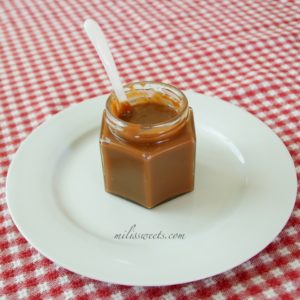
Mili's Sweets Old Fashioned Caramel for apples and dessert topping
Making caramel the old fashioned way is a labor of love. Deciding to make it happen depends on how badly you want it. There are plenty of short cut recipes for sauces and dips that taste similar, but they can't compare. Once making caramel this way, it's really hard to turn back to store bought versions, that tend to be thin, runny and lack real flavor. I like the thick texture and richness of the real thing.
Ingredients
- 2 cups light corn syrup
- 4 cups granulated sugar
- 1 can sweetened condensed milk
- 1 and 1/2 cups whole milk
- 1 cup heavy whipping cream
- 1 cup (2 sticks) salted butter, cut into pats
tTools: one large pot (the taller, the better), long wooden spoon, clip-on candy thermometer
Instructions
- Before you get started, plan ahead with the understanding that you will have to tend to stirring the pot for approximately 3 hours! You might need a good helper or two to take over from time to time. Otherwise, you are guaranteed to have soar feet and possibly soar shoulders/arms if you aren't used to constantly stirring in the kitchen. As I mentioned above, you have to really want caramel to make it!
- Here's a little math so that you can plan ahead, based on what you are hoping to use the caramel for. I tend to make at least two batches at a time, but what I'm sharing with you is a single batch. It will make about 64 oz of caramel, that can be placed in the size of glass jars that you see fit or can be used to dip apples as soon as it has reached the "Soft Ball" stage. When giving a gift, I pour it into pretty 4oz. glass jars. When keeping it in jars for my pantry, I tend to use 8 oz jars and there's nothing fancy about them. It takes between 1.5oz. - 2 oz. of caramel to cover one standard sized apple for caramel apples so you should be able to dip about 32, if that's what you are going for.
- Combine all of the ingredients, except for the pure vanilla extract, into a large pot and place at medium heat. Clip on the candy thermometer. Cook and stir constantly until candy thermometer reaches 240 degrees, or "Soft Ball" stage. Seems simple and it is simple. It's just that some good things come to those who wait and this project requires a lot of time and patience.
- When the butter melts and all of the ingredients are starting to heat, the thermometer will read 200 almost right away. The mixture will be a creamy white color. You'll notice a warming of color when the mixture reaches 220. However, it will stay at 220 for what seems like an eternity! All the while, you need to stir with the wooden spoon. It can overheat and come over the top of your pot if it is not large enough, so make sure that there is ample room in the pot when you first pour in your ingredients. You don't want a messy or dangerous accident. You can't leave the caramel cooking by itself, so make sure you have a caramel-buddy to hang out with, in case you need to leave the room.
- When the caramel finally starts to reach above 220 degrees, you're in the home-stretch. It will take about 30 minutes more to reach "Soft Ball." You are going to think to yourself two hours into it, 'It must be ready . . . it looks like caramel!' But trust me, the thermometer is your friend and without it, this job is almost impossible. If you shut it off too soon, you won't have the result you were hoping for.
- You will feel thrilled and accomplished when you see it has reached 240 degrees. Remove from the heat right away. Allow it to stop bubbling and to cool for a few minutes. Add the teaspoon of pure vanilla extract. Use the wooden spoon to combine.
placing finished caramel into jars or to reserve to future topping
- If you are placing the caramel into glass jars, do so when the caramel is hot. Line up the cans and use a ladle to pour in the caramel. Cover tightly with a metal lid. Within moments, the heat will create a seal that you can hear. It will only work if you are using new lids that are not punctured and are meant to fit perfectly with the jar. You can use either a mason-jar type lid or other metal lid. You will know it's sealed because you can hear it close and there is no air to pop the lid. You will only hear the lid after the seal has been broken or it has been opened.Label the container and be sure to add the expiration date. You can give the caramel a one month shelf life if they have set and sealed properly. Once they are opened, or the seal is broken, the jars must be refrigerated. To be safe, you can give as a gift, and write "keep refrigerated." Add the expiration date as one month after the made-date. If always refrigerated, it should last up to six weeks, but that is assuming that it doesn't disappear after the first taste.
covering caramel apples
- If you are making caramel apples, you'll want to have your apples ready to go as soon as the caramel stops boiling and has reached the 240 degrees. I recruited some little hands to help clean and dry Granny Smith apples. To be safe, we made the skewering a team-effort. These were the only jobs my 7 year old son wanted to do, or could do without getting hurt.
- I use prepared, 5.5" wooden skewers but you can use any wooden dowel, as long as they are cut to size and there there is one end with a sharper side. The easiest way to create the point is with an electric pencil sharpener. As long as the sharper side is not totally blunt, it will work. It's not a good idea to make it too sharp, so be careful.
- If you are using the entire batch of caramel for dipping caramel apples, you'll be able to make about 32, depending on the size of each apple and how much you want to dip them. I like to go toward the top and if I'm not completely dipping the apple, I always make sure the center, where it was skewered, is covered with caramel. Doing so keeps the apple sealed and fresh and the extra little collection of caramel at the top is an extra special treat. Caramel apples are swooped up and enjoyed right away with this caramel, but I like to be sure that they they are enjoyed within two days of making them. You can go up to 4-5 days, if wrapped and kept at room temperature. Of course, they would last longer in the refrigerator
reheating prepared caramel for apples
- Use a spatula to remove the caramel from the glass jars, and place into a pot, with a candy thermometer attached. Place at medium heat. It will only take 10 minutes for the caramel to return to reaching the "Soft Ball" stage of 240 degrees. (As promised, all the hard work from making caramel the old fashioned way is behind you!)
- Dip the apples right away. If you want to remove some of the access caramel, use a metal spatula or butter knife to take it from the bottom and then place onto a matt of some sort. A waxy or parchment-type of bottom would be best if serving open or wrapping in cellophane. Although the doilies were very pretty, the ones I used didn't have a waxy finish, so the caramel had a hard time separating from the paper. If you aren't packing them to share and want to eat them right away, you can allow them to cool onto aluminum foil before serving or placing directly onto a plate.
reheating prepared caramel for drizzle and dessert topping
- To create a sauce from the caramel that has been canned, simply place it in the microwave for 30 seconds first and then an additional 10 seconds at time. A 4 oz will become a sauce in 30 seconds.